It doesn't matter if you are a professional or non-professional woodworker; it is not an easy task to sand wood. It requires time, labor, and practice to achieve the best finish by a perfect tool. In this case, if you have a suitable Random Orbital Sander, it will help you to get the best sanding.
When you are looking for the best random orbital Sander for your woodworking projects, it's important to review a variety of different factors. In this article we describe how to use a random orbital sander properly 4 easy steps.
It has to have the ability to perform the task rapidly and correctly. For that reason, operational capability features like start speed, changeable or fixed orbit speed options, disc-size consistency, and motor power can measure heavily in your decision.
However, at the same time, your future power sander will probably be vibrating along in your hand for a long time, so it should be easeful to use.
What is a Random Orbital Sander?
Random orbital sanders are naturally hand-held power tools for sanding wooden furniture. This device has a sanding blade that delivers a random-orbit action.
It spins the sanding performance in a circular way to move the whole pad in an oval orbit around the center of the z-axis on the Sander. That means the angle of rotation of the head and disk is alterable.
Because of this random sanding action, the tool does not leave any revolving marks and is not tender to the direction of the wood grain.
The Sander sustains the sanding particles from retouching the same portion of the item while you are sanding. As a result, it brings a unique finishing.
How to Use a Random-Orbital Sander
We'll explain to you how to use a random orbital sander, the most commonly used power sanders, for a professional look. What you need to do is to link a ventilation system, and sandpaper (usually the sandpaper rounds come with an adhesive back), and your tool is ready to use.
The following steps will lead you to the process of using a random orbital sander. If you're an initial sander, don't worry. The process is straightforward. In no time, you'll be able to sand like a pro and extend your skills to a variety of carpentry projects!
Step 1: Prep Materials
Secure your stuff to a work surface using clamps. This prevents it from moving and possibly dangerous hazards. Once your material is ready, connect a ventilation system to your Sander. This will collect the sawdust that accumulating while working.
Step 2: Attach Sandpaper
Be sure that you're choosing an appropriate grit for your project. Probably Coarse grits like 40 and 60 sand faster and are suitable for sanding heavy materials, with such as those with a tough finish or notches that need to be sanded away.
However, a coarse grit may leave nicks on smooth boards that don't need much sanding. Finer grits like 180 and 220 go a smooth finish, but it can take a long time to get the expected outcome.
Most random-orbital sandpaper has an adhesive back. Normally peel off the backing and press it onto your Sander.
Step 3: Start Sanding
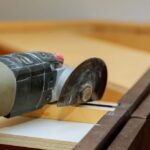
Switch on the Sander. Let it go up to full speed before gently placing it on your material. The Sander instantly starts moving along the wood grain for a smooth finish.
Gently guide the saw with mild pressure. Do not press forcefully, or you might groove or dent your material.
Step 4: Finish Up
Sand the edges of the material hanging a third of the sanding pad over the wooden border. When the total area and all edges are executed, turn off the Sander.
Brush any remaining rice soil with a clean cloth. Provided you desire, attach a piece of sandpaper with a finer grit, and repeat the process.
Random Orbital Sander Dust Collection
Most of the random orbital sanders you are using today have holes on the sanding media, which allow you to collect dust by pulling the particles from the working product, storing it in the Sander itself.
Some sanders have a bag attached at the back, while others may have a filter. The best option is that a sander has a hose, which leads to an active dust collection system.
Tips on Using a Random Orbital Sander
Follow the below tips while using the Random Orbital Sander.
Slow Down while Sanding
It's necessary to go slow a random orbit sander, for better performance. It's common to scrub back and forth in a hurry. But that produces swirls. Slow down! Go slower, and the more random the scratches will be.
Note it ten to twelve seconds per linear foot is ideal speed — about an inch per second.
Go Lightly
There is a common mistake Pressing down on a sander Do not press the Sander down. Allow it to act under light pressure. It is enough pressure of its own weight of a sander for sending of wooden furniture.
Park It Before You Start It
Turn the Sander on, also let it spin until it speeds up before you make contact with the material you are sanding. If your Sander is running before you set it up, chances are it will dig in and leave a deep scratch.
Overlap Passes
The overlapping pass is an excellent idea for better performance on a large surface. 50% overlapping each pass is ideal.
Send the entire area formerly-that will be enough. That will be enough. Identify an essential way to keep track of your different spirits of sandpaper and 44 other super handy hints.
Hold It Low
To avoid tipping a sander on a thin surface, hold it on its neck. A sander dripping leads to gauges, scratches, and rounded edges. Check about one sanding block about permanent.
Hook Up to a Vacuum
A vacuum pulls every bit of sawdust off the wood's surface—route superior to the fan inside the Sander. This keeps the sandpaper clean so that it can cut quicker. It likewise implies significantly less airborne residue and cleanup later.
Keep your workshop murmuring with any of these workshop tips and assistants.
Sand Twice as Fast
Working with a sander in both hand takes a little practice. However, you'll get its hang. Keep them close by one another and move gradually. If you let them meander in various ways, you'll sand a few regions more than others.
What's more, that can prompt a conflicting completion. Find more deceives on the most proficient method to speed up sanding.
Final Impression
A random orbital sander can easily become your favorite tool – especially if you utilize it correctly to its full potential. When you have finished using your Sander, don't forget to leave it on the product's surface until you have switched off the Sander. Once again, be sure that you have turned off the Sander and have stopped spinning.
When you switch off the Sander, you need to ensure that you maintain it properly by cleaning it before storing it away. Using a random orbital sander helps shape a perfect wood, plastic, or metal-working product that you can be proud of.
There is no alternative for creating something out of nothing by using your own hands. Just remember to use your random orbital Sander properly.